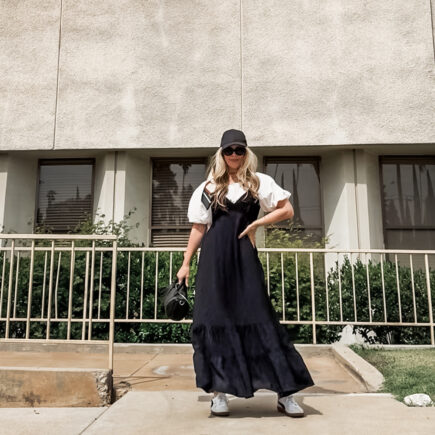
Houndstooth is by no means a new textile, however, it has hit the fashion trend radar once again and seems to be popping up in every magazine I open as of late. Most blame Lady Gaga and her outrageous head-to-toe houndstooth ensemble. And she may have brought it to the masses attention but the dress & shoes she was wearing were from the Salvatore Ferragamo Autumn/Winter 2011 collection wherein Houndstooth was one of the main prints seen in fine and exaggerated proportions. Chanel & YSL touched on it as well for 2011 {and it's a Staple for Gwen Stefani} but Ferragamo sold it this season, in my opinion. I recommend watching the runway show, it's GORGEOUS. I would wear every single look. You can buy Ferragamo's gorgeous snakeskin Houndstooth shoes for $950 OR you can make your own. Here's how...


* A pair of pumps. **A moderate pointy toe will work best.
* Cotton houndstooth print fabric. I found mine at JoAnn's and what I thought was black and white noticed when I returned home, was navy.
* Mod Podge original. You may also use a fabric glue but Mod Podge works the best.
* Craft Sponge brush
* Scissors
* Patience... this is not an easy one.


* Cut out two irregular shapes {a pentagon of sorts}. My measurement is for a 3" heel. Adjust for longer or shorter heels. **Make sure your print/pattern direction is the same on both.

* Using your sponge brush, lay on a relatively thick layer of Mod Podge to your heel. Do one at a time.

* With the triangle side up, place your fabric on your heel and smooth out.

* Cut a slit in the fabric {on either side} where the heel meets the shoe in order for the fabric to lay smoothly. **If your fabric is buckling anywhere else, make a similar slit to smooth it out. Let dry. Once dry, trim the edges leaving about 1/8" around each of the sides.

* Next up is your toes! FIRST Cut two large rectangles from your fabric. Mine were about 18" x 24" - I wear a 9, measure your shoe accordingly, you should leave ample room for error on all sides. **Mod Podge the front toe of ONE shoe.

* Decide which direction you want your print to lay. **Remember to match the other shoe the same direction.

* Giving yourself over an inch of allowance on each side, lay your fabric over your toe and smooth out any bubbles. Do the same to the other shoe, allowing this one to dry and set into place.

* Once your toes are set enough {they don't have to be completely dry but at least steady and immovable} cut a triangle out from the excess fabric at your toe, leaving at least 1/8" allowance {longer than the sole}. **Press the front down to set in place. {see below}

* Adding more glue to your edges and toe, fold and glue down each side, creating an envelope flap type of crease... fold over your edges twice to prevent fraying, and/or add more glue.

* Wrap your fabric loosely under your shoe then carefully cut a small slit in the opening. **Making sure you'll have enough fabric to cover both sides of your shoe, make the slit larger so that each side will lay flat.

* Beginning with one side and one shoe at a time, add your glue and carefully smooth your fabric over each side. **Wherever it buckles, snip the edge like we did with our heels to allow the fabric to lay smoothly. Just don't snip too far!

* Once your shoe fabric is set in place, trim off the excess leaving at least 1/4" just to be safe.

* Glue one side of the back/ankle down then the other flap over it. **Create a nice, clean, fray-free seam by folding over your edge first and centering it with your shoe's real seam.

* Trim excess fabric around entire shoe to 1/8" or less. **You may choose to cut your fabric just above the shoe's natural sole {so the sole will show} or flap it over the edges. I did both, depending on the area of the shoe.

* Adding extra Mod Podge to the inner edges {that I left a little less than 1/8"} press down. **Do this around all of your edges.


* I wasn't sure how exactly to merge the seam of the heel with the seam of the shoe so I created a ribbon to hide it. **Cut a strip about 24" {to be safe} long by 1" wide, glue,fold,glue, fold until you get a ribbon, then cut in half. **You'll need two 6"-12" ribbons for each shoe. **You can also choose a contrasting or solid fabric or ribbon if you like. **Adding a good amount of glue around the seam, I carefully create a bow of sorts to hide the seam. I glued them to the inner side of the heel for extra support.

* The very back of the print of the heel/shoe lined up perfectly, though the sides do not. I'm okay with that :)


* Vintage tassel pouf shoe clip *
* Click See this DIY featured in Nova Gente SOLUÇÕES Magazine *
Have Fun!


49 Amazing people left a comment here:
WOW Maegan....you should have your own DIY site.
LOVE these! they turned out so great! your DIYs never cease to amaze me :)
xxx,
Fashion Fractions
I love houndstooth print and DIY's! You're so crafty, they look great! :)
♥ Check out my blog: Principessa Gabriella
Ohhh dear..
Very nice idea.Loveee lovee lovee..
I like it.They look wonderful.!
kisses from Turkey!
.nzlsyn.
.nzlsyn. giveaway
That's a great idea! I love your DIY things. <3
L.O.V.E. these!! You are so talented and creative it's crazy incredible! I've been looking forward to seeing what this DIY was going to be... and WOW... so impressive!
This is so friggen amazing! I'm in love, I need these :)
xx
Lia
Wow! This is a pretty nice diy project!
www.HouseOfDaria.com
They are so cute!
love it! this probably isn't well-known outside the South, but houndstooth is basically the official fabric of the Alabama Crimson Tide, haha. (our legendary coach, Bear Bryant, would wear a houndstooth fedora while coaching.) so on any given gameday you'll see houndstooth sundresses, houndstooth shoes, houndstooth bangles, houndstooth baseball caps, houndstooth pea coats, and of course houndstooth fedoras. :)
They came out great! I love anything houndstooth.
Gah you make it look so easy...I am extremely tempted by this craft.
~Stop Me if You've Heard This One
These shoes are great! I'm really impressed how they turned out.
WOW. just wow. i do not have the DIY gene. those turned out amazing!
xoxo, jenn
the stylish housewife
WOW! They look amazing! This is a fantastic project!
www.theprettyfactor.blogspot.com
1. I'm so excited I found this!
2. Does the Modge Podge get sticky after wearing the shoes all day?
the look really amazing
I love these shoes! With just using glue how well do they hold up? Your DIY projects are always genius. :)
These are fun and delightful!
The shoes are wonderful!
Holy cow that was impressive just seeing pictures. I am itching to try this, even though I know it will probably end in a big Mod Podge mess and a lot of swearing. But it will be a fun Mod Podge mess with a lot of swearing.
Also, creating that ribbon for the seam was ingenious. Attention to detail and practical!
GlamCake
so fancy! You are so crafty! I always love your tutorials, even though my craftiness is non-existent.
this is AMAZING! i have no idea how you do it! i just stumbled and pinned :) http://pinterest.com/pin/13792342578436906/ (not sure how to mention/tag you, but i tried ;)
This may be one of your best DIYs yet! Now please make a little tassel shoe clip diy, haha! ;-)
You really are the DIY queen, Maegan! These shoes look so professionaly done!
xo, alison*elle
Absolutely amazing!
they are SO CUTE!!! just adorable!!! and perfectly paired with LEROY! :)
What a fantastic, stylish, trendy and creative DIY...I love it! Thank you for sharing...FABULOUS work!
Liesl :)
stellar!
Awesomeness! The poof clip makes the shoe!
Love this! Such a great idea.
You are like the Martha Stewart of fashion. These turned out unbelievably great. Can't wait to see them in an official outfit post!
Wow.
I mean....that is some serious DIY-ing right there sista.
I wish I could just have you to do all that for me, while I sit next to you and eat Peanut M&M's and watch reality tv and gossip. =) That sounds way more fun.
You are amazing...the things you come up with! I swear Megan-you need your own clothing/shoe line! It would help those of us w/two left thumbs=lazy!lol
**Stop by & check out my post-Jullien turns 20! He signed w/new agency too!
http://lisapetrarca.blogspot.com/2011/11/julliens-20-today-is-it-possible.html
amazing and talk about awesomeness!!!!
www.fauxtreschic.blogspot.com
WOW!! another awesome D.i.y.they look fantastic :)
Wow! I had no idea these were DIY until I read your how-to. An incredible job - so chic!!
xoxox
Carly
You are seriously incredible with your DIYs!!!!
Hello Maegan! I just featured you (with this project) on my blog, here: http://moderngirl.jurna.ro/?p=222. Fabulous work! Thank you!
You're amazing, Love these.
Ooooh. Three things I love: Mod Podge, frenchies, and shoes!
Nice Copy Cat Project... Looks like you copied another blogger's idea for Houndstooth Mod Podge Shoes that has been all over pinterest for months. Use proper etiquette and give credit when credit is DUE!
Wow - I am amazed at your crafty skills! These look absolutely amazing!!!
Hi! My name is Anna, I live in Russia. We have a girl that shows your pictures and lessons for their remodeling! It puts its stamp on all your photos and publish them, not to mention you get paid! http://fashiony.ru/page.php?id_n=60757 I think you should demand from the site so as not to put a signature on a picture and give a link to you! admin@mobtel.ru
This is details information must be sharing to the all the user thanks to the author for the supported keep up it. Thanks…
doctor reviews by patients
find doctor list
Love this DIY! Here is mine!
http://instagr.am/p/WnX7w/
OMG they're fabolous! great job as always!
Love this.....So awesome....
Great DIY! I used it to cover the heel and platform on my DIY here: http://www.aprilgolightly.com/2012/01/diy-hottest-shoe-for-spring-burberry-inspired-beaded-sandals/
Thanks for your help. I appreciate it.
Post a Comment